Help Guide and Video Tutorials
Signing into your account
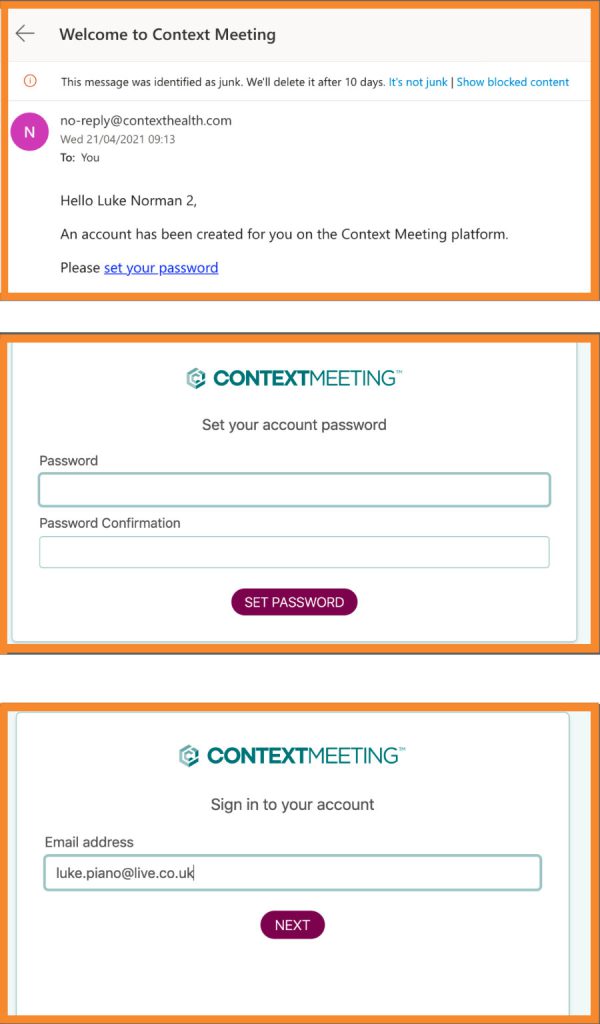
1. You will receive an email from context meeting instructing you to set your password. Please click the ‘set your password link a the bottom of the email to proceed to step 2.
2. You will be take to a page in your default internet browser to set your password and then confirm you chosen password. Once you can filled in these fields, click the ‘SET PASSWORD’ button.
3. You can then use the email address (that you received the email from) and enter your newly set password to sign into the Context Meeting Platform by clicking ‘NEXT’.
Editing your profile
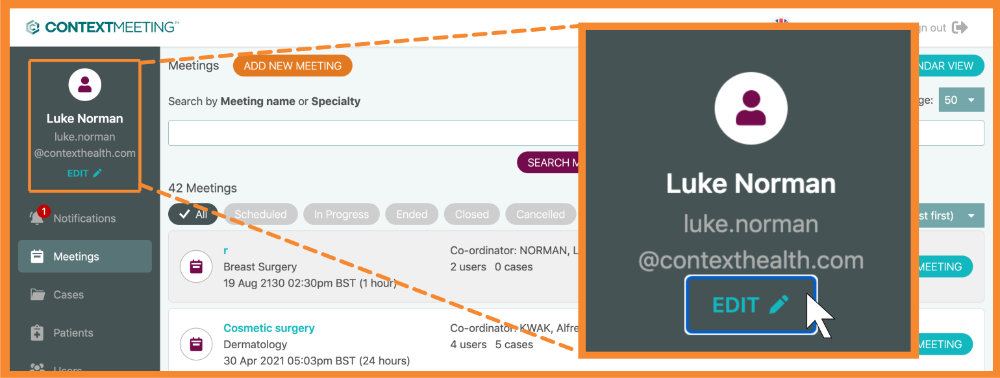
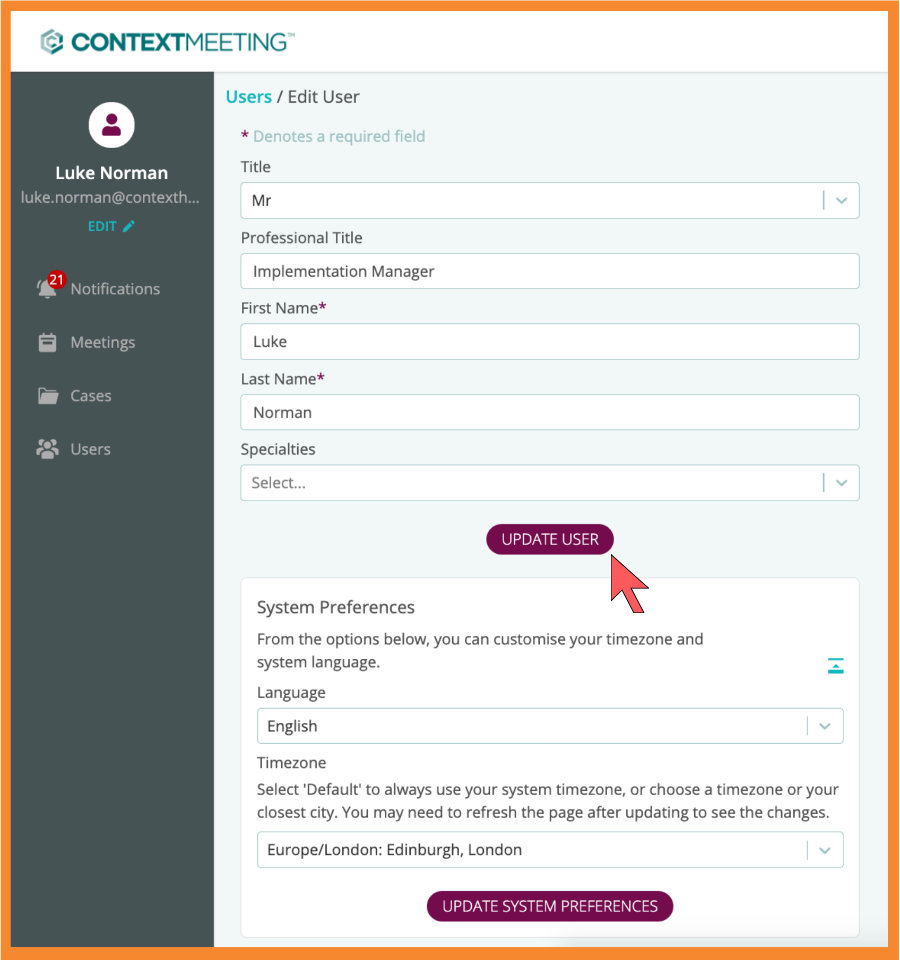
As a user of Context Meeting you will have the ability to amend your clinical details as-well as notification preferences and timezone. You can edit your profile by the side menu panel of Context Meeting and clicking the button.
On your edit profile page, you will be able to amend the following fields:
– First Name & Surname
– Professional title
– Specialty
Please note, it is important to ensure your details are up to date and correct as they will be presented throughout the system as well as in the case and meeting reports generated. We also offer system preferences to configure your timezone and preferred language.
Please note: Fields marked with an asterisk are required to update your profile. Once you have filled in the relevant fields to update or amend your user profile, click ‘update user‘ to save your changes. When changing your Language and timezone, you will also have to save the changes made by clicking ‘update system preferences‘.
System notifications
The system optimises user experience with notifications to keep you up to date on clinical decisions and evidence against case files. These will be presented both within the Context Meeting platform as well as an email sent (prompt after 15 minutes if haven’t signed into the system).
Primarily, Notifications feature in active comments where you can mention/ be mentioned on a case or meeting. This can be performed by using the ‘@’ symbol in the comment box to generate a list of members relevant to the case or meeting. Once the comment has been saved, you will receive a system prompt and an email informing you of the mention.
Notifications will also be used for the following:
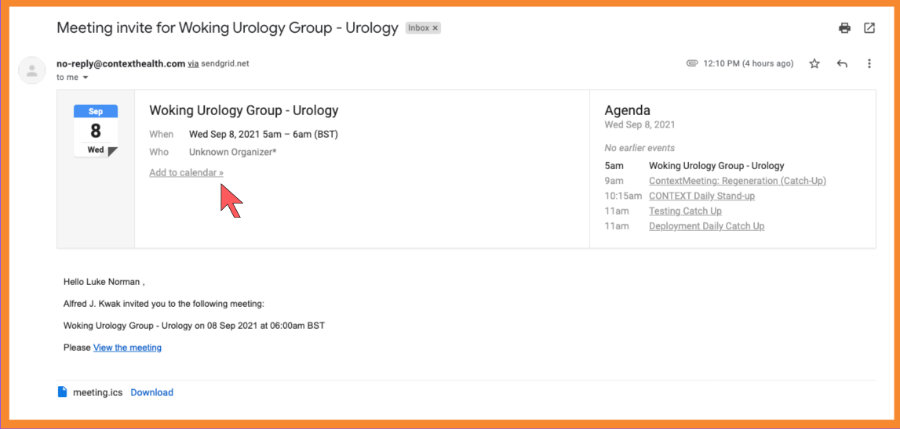
– Meeting invites
– Recommendation approvals
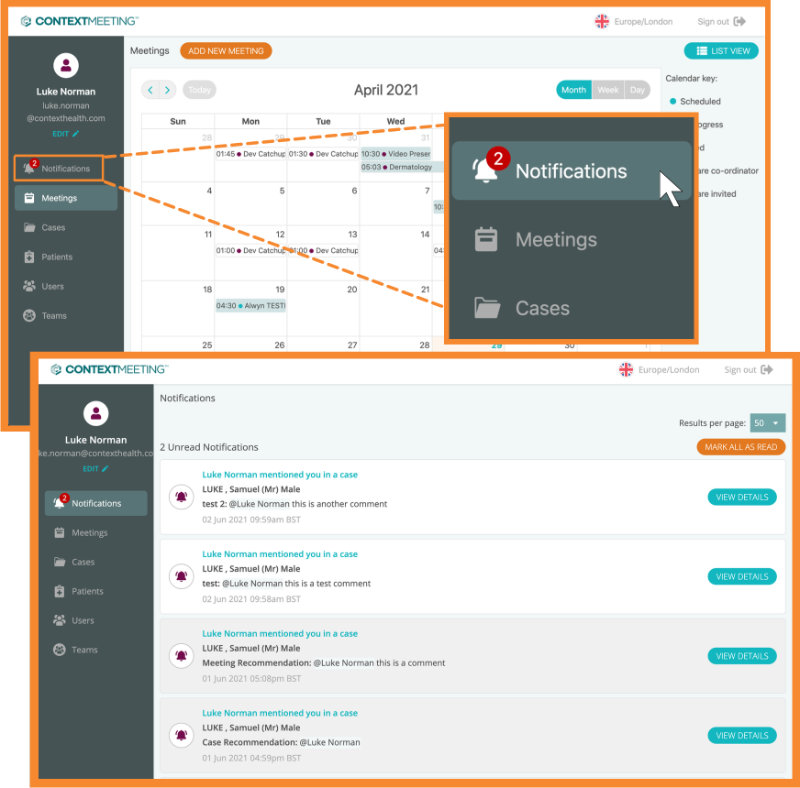
You can access your notifications by simply clicking ‘Notifications‘ on the left hand side menu. The red number next to this section will tell you how many unread notifications you have.
In your notifications section, you can ‘view details‘ of the notification which will take you directly to the case or meeting. If you want to clear your notification inbox you can simply click ‘Mark all as Read‘.
Email notifications
Viewing a patient
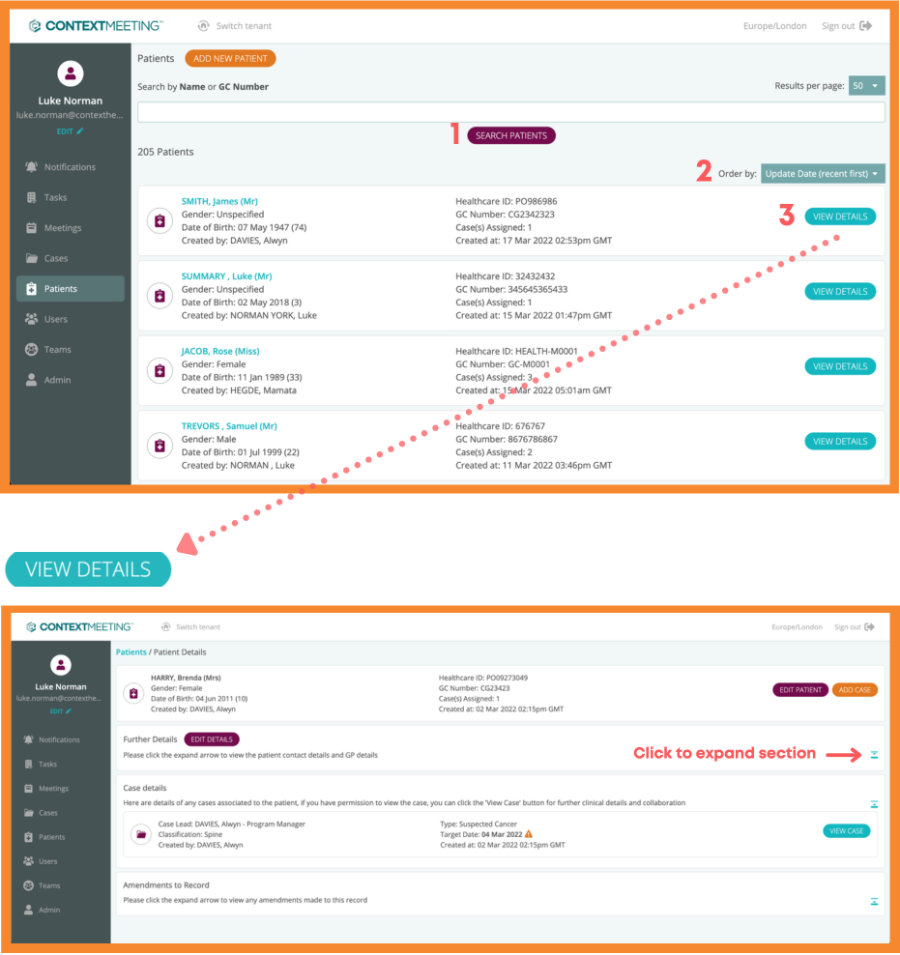
Select ‘Patients’ on the side menu.
1. Search – Begin typing and select your patient
2. Filter – Select filter option to your preference
3 .View Details – Expanded view of the Patient
Creating a new patient
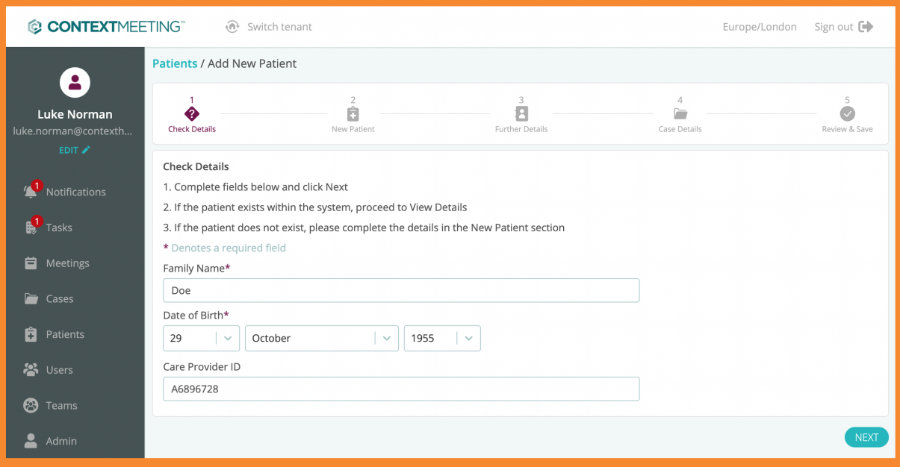
Click Add A New Patient button to open the new patient form.
1. Check whether the Patient exists already in the system. If Yes, the page will return the patient record for you to view. If the Patient doesn’t exist, you can continue to Step 2 of the form.
2. Complete the blank fields and click ‘Next’.
3. Further details page (this form is optional and can be skipped).
4. Case Details page (optional to a create a Case for the Patient at this point).
5. Review and Save Details page.
Once saved, this Patient will be at the top of the Patient Index page
Adding a case to a patient
As a user of Context Meeting you will have the ability to view, edit and contribute to cases. These cases can be reviewed by a case membership group or associated to a meeting for live discussion. Each case contains a creator, a case lead and a membership who can upload relevant clinical data and discuss a treatment plan in a flexible and efficient manner. They allow you to:
– Upload files (PDF, PNG, JPG)
– Upload URL links (online image viewing systems)
– Add comments (with tags for notifications to the membership)
– Add decisions (to lock down assets on the case)
– Add recommendations (for consensus approval from membership)
– Lock Case (clinical safety measure governed by the case lead)
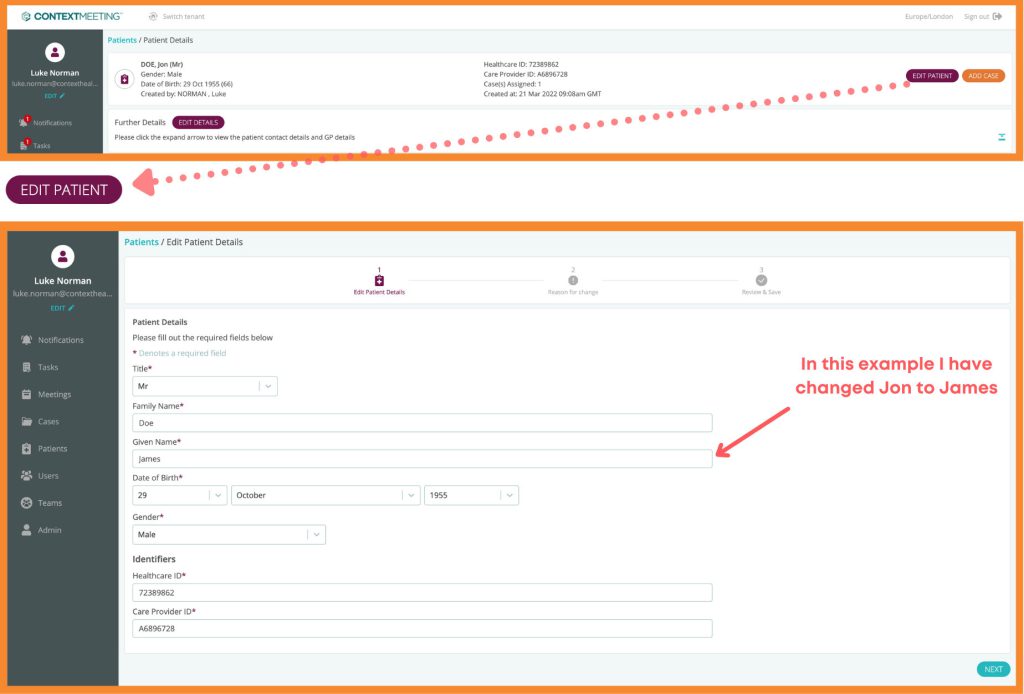
Editing patient details
If you have created the patient or are an Administrator of the system, you can edit a patient’s details.
You need to provide your reason for a change and confirm whether the change is a record update or data error. Once you have confirmed the reason, click next to review and save the amendment. This change will be presented in the patient record, and its history stored in the amendments to record section.
Viewing a case
As a user of Context Meeting you will have the ability to view, edit and contribute to cases. These cases can be reviewed by a case membership group or associated to a meeting for live discussion. Each case contains a creator, a case lead and a membership who can upload relevant clinical data and discuss a treatment plan in a flexible and efficient manner. They allow you to:
– Upload files (PDF, PNG, JPG)
– Upload URL links (online image viewing systems)
– Add comments (with tags for notifications to the membership)
– Add decisions (to lock down assets on the case)
– Add recommendations (for consensus approval from membership)
– Lock Case (clinical safety measure governed by the case lead)
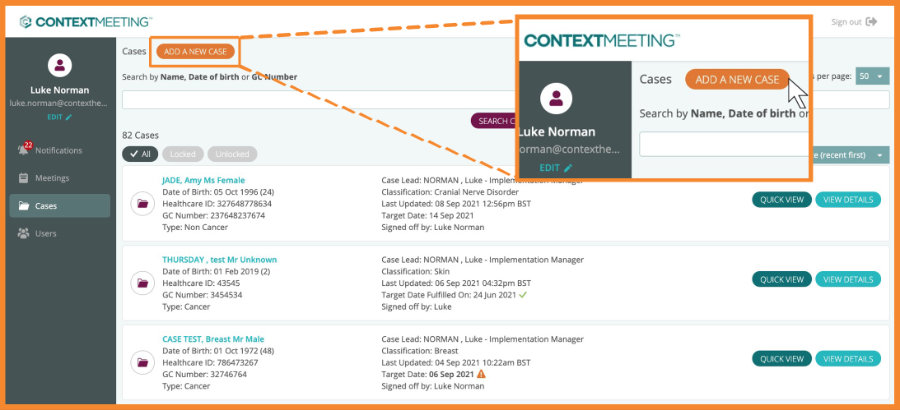
Adding a new case
To create a new case, simply click on the cases section in the left hand menu and click on ADD A NEW CASE.
You will be taken to a new case form where you can fill out the patient demographics as-well as the case details. Fields marked with an asterisk are required to update your profile. Once the form is complete, click the CREATE CASE button.
* Please note: the target date f ield is used to indicate when the membership is aiming to save their recommendation for the case. This is not mandatory so does not need to be populated.
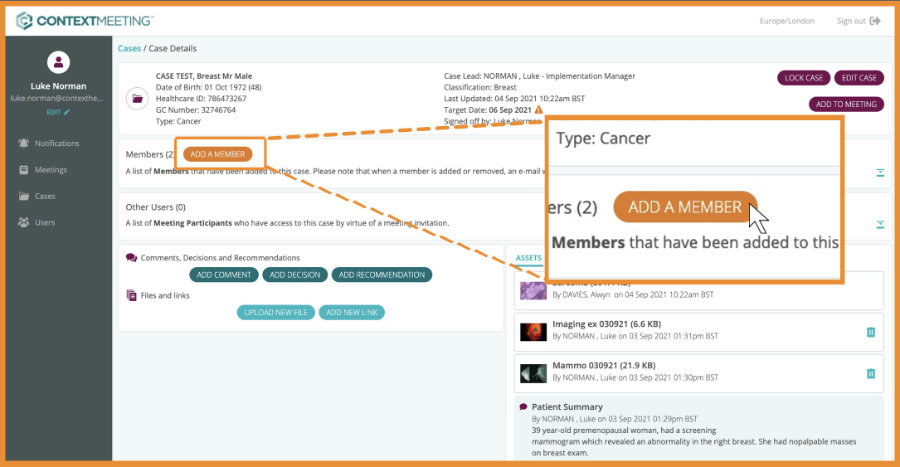
Case members
Each case can be associated to a membership. Once the case has been created, the creator can add members to the case for further collaboration using the ADD A MEMBER button. You can search the members you wish to add or scroll through the drop down list and simply click to select.
Once you have selected the members you wish to add to the case, click the ADD MEMBERS TO CASE button.
The members you have added will appear in the members section on the case which can be expanded and collapsed when needed. If you are the case lead, case creator or case admin, you have the ability to remove members from the case. To do this, simply click the REMOVE button next to the relevant member(s).
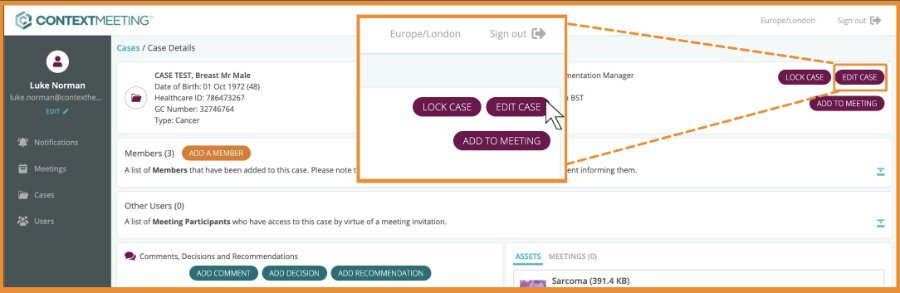
Editing a case
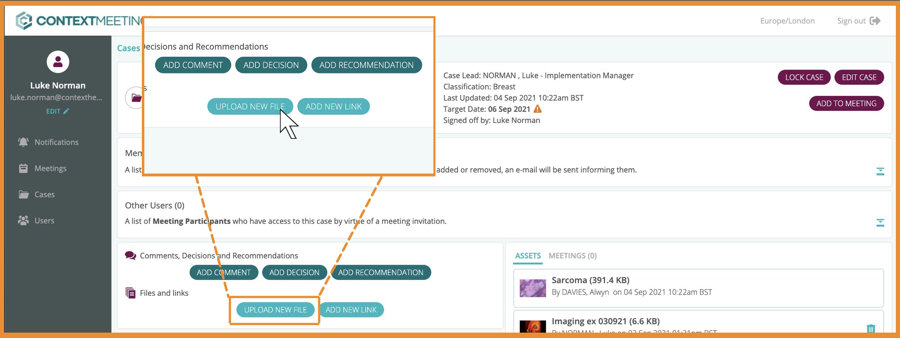
Case files and links
Case files can be uploaded directly to the case by case members. Accepted file types include: PDF, PNG and JPG files.
To upload a new file click the UPLOAD NEW FILE button. You can use CHOOSE FILE to add a file to the case from your local device. After choosing your file, you can rename it using the title field (this is an optional step). Following this, click UPLOAD FILE to add it to the case. Your uploaded file is presented in the assets section of case where it can be viewed. To view the file, simply click on the file box. This will be presented in a window where you can zoom and drag around images. Files can be removed from the case by the user that added them if they are not associated to a decision or recommendation. Use the delete icon next to the file to remove it from the case.
Uploading links is also useful to support online image viewing systems where a URL can be exported and pasted into the case. To upload a new link to the case, use the ADD NEW LINK button. In the link form, give your link a title and copy and paste the link URL you wish to add. Click the add link button to add your link to the case where you can view it within your case asset list.
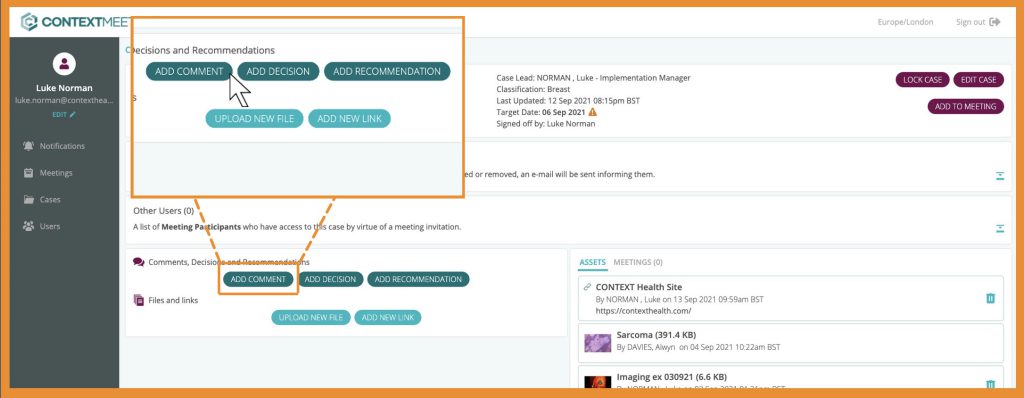
Comments and Decisions
Case members can contribute comments and decisions to a case as part of their collaborative clinical effort.
To add a comment to a case, click the ADD COMMENT button. Fill out the required fields to complete the comment form. Please note in the ‘body’ field you can use the @ symbol to notify case members of your comment by system notification and email. Once completing the form, click the ADD COMMENT button.
Decisions on the case are a way of members adding a comment which locks the assets prior to it to the case. This means they can’t be edited or deleted. Once you have added your decision, you will not be able to delete it.
To add a decision to a case, click the ADD DECISION button. Fill out the required fields to complete the decision form. This should look identical to the comment form where you can tag case members in your decision.
Once completing the form, click the ADD DECISION button. You will notice you are no longer able to delete the assets below your decision in addition to the decision itself. Please note, you can still add further contributions to the case after a decision has been made.
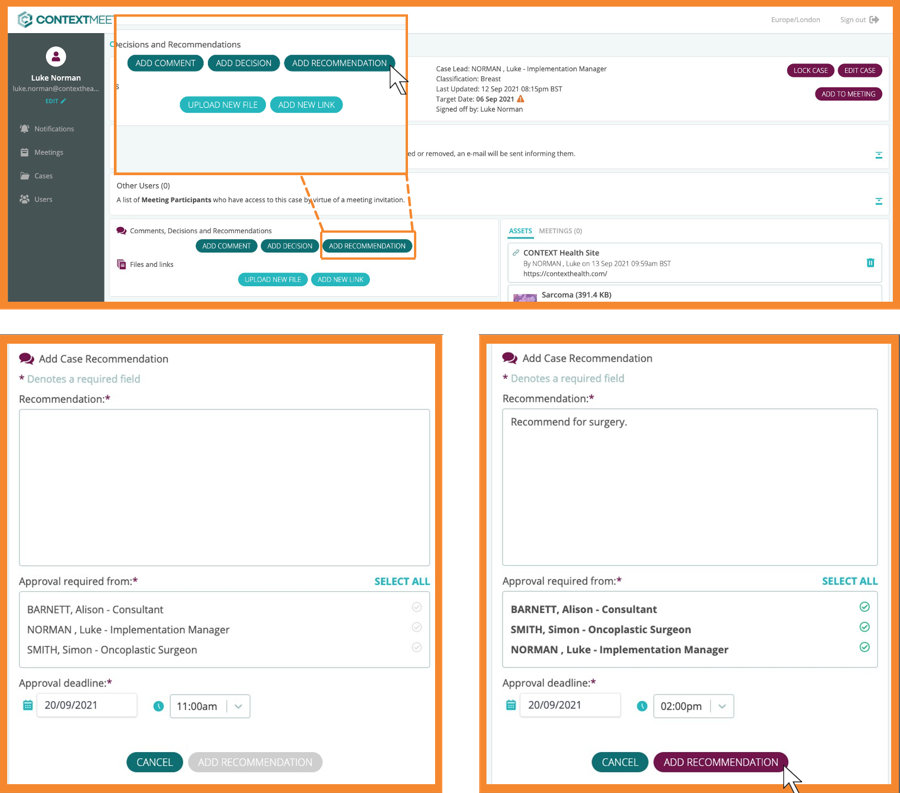
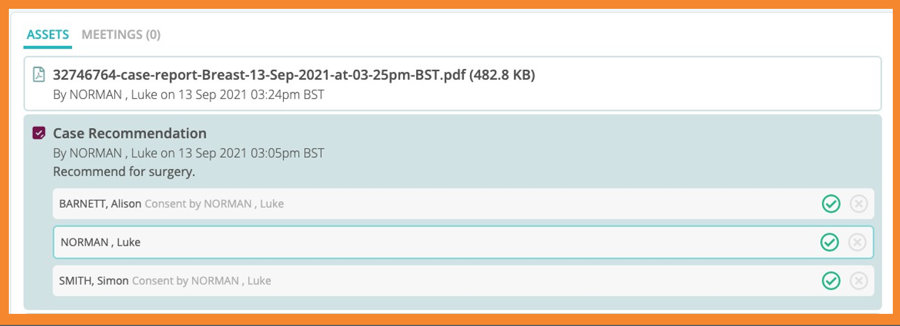
Recommendations
Case members can create recommendations of which they can select required members to approve. Once the recommendation has been saved, a case report is generated documenting the outcome as-well as any previously associated files and comments.
To add your recommendation, start by clicking ADD RECOMMENDATION. Type the Recommendation in the Recommendation field, mark the members who are required to approve the recommendation. These members will receive a notification both on email and system asking for their consent. You can also add an approval deadline.
Click to save your recommendation as “pending”. Your recommendation will present as a pending state on the case until the required members consent or you consent on their behalf. The case recommender can only save the recommendation once it has had consent from the required approvers. This can be marked on their behalf by the recommender if necessary.
To save your recommendation click the SAVE RECOMMENDATION button. Once the recommendation is saved, a case report is automatically generated to document the recommendation as-well as any prior evidence on the case.
Report generation
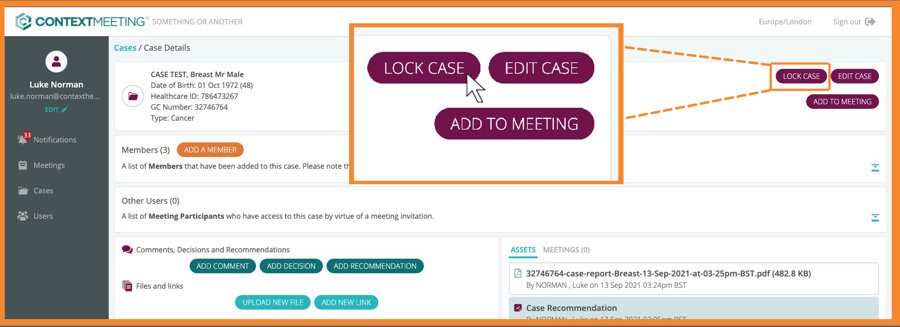
Lock case
Once a case has been discussed from either a meeting or cases membership review, the case lead, case creator (and case admins) can lock the case to ensure no further collaboration is made. This creates an immutable record at that moment in time as the treatment has been finalised by the relevant clinical team.
To lock the case, click the lock case button in the top right corner. You will be presented with a warning message as locking the case will lock all assets and membership so no further detail can be added. Please note, cases can only be locked when the meetings they are associated to have been ended. As the case lead, creator or admin you also can unlock the case to further contribute.
Calendar
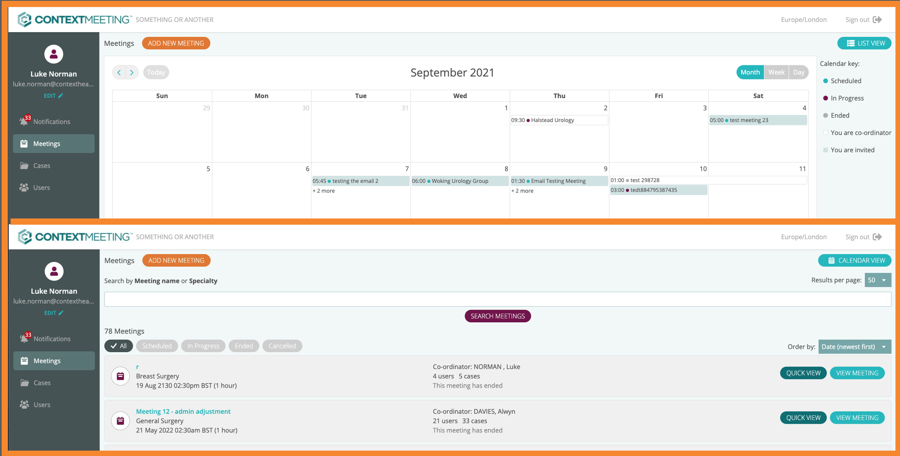
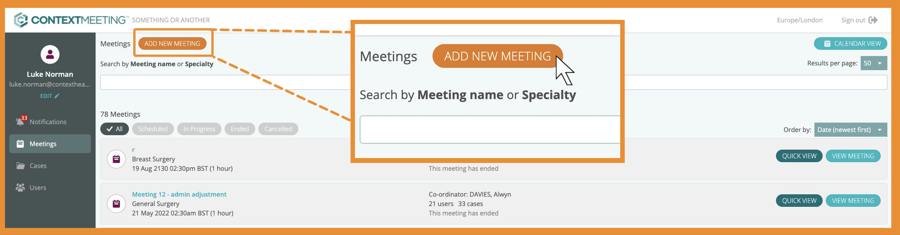
Creating a meeting
Creating a new meeting is made simple by using: ‘ADD A NEW MEETING’. This will take you to an ‘add new meeting’ form where you can:
1. Title your Meeting
2. Assign a Specialty
3. Assign a Coordinator
4. Assign Participants
5. Assign a Date and Time
Once you have completed the form, click ‘CREATE MEETING’ to save it. You can now see the meeting in the list view.
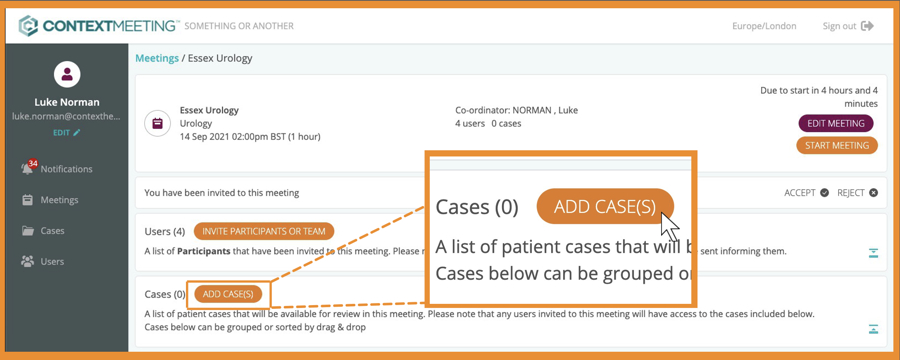
Add cases to a meeting
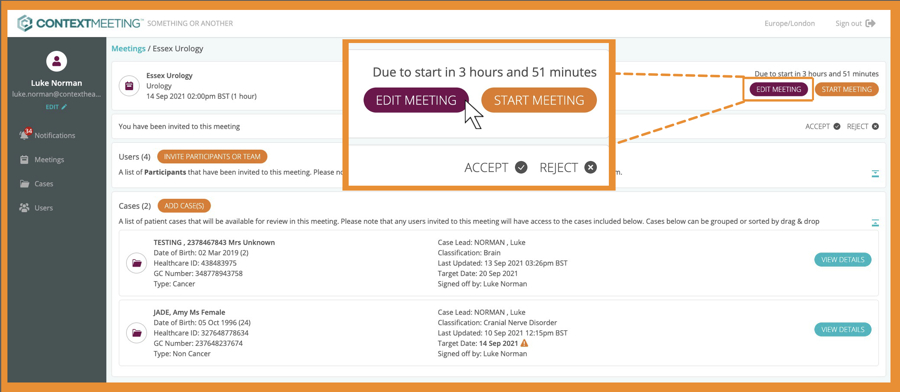
Editing a meeting
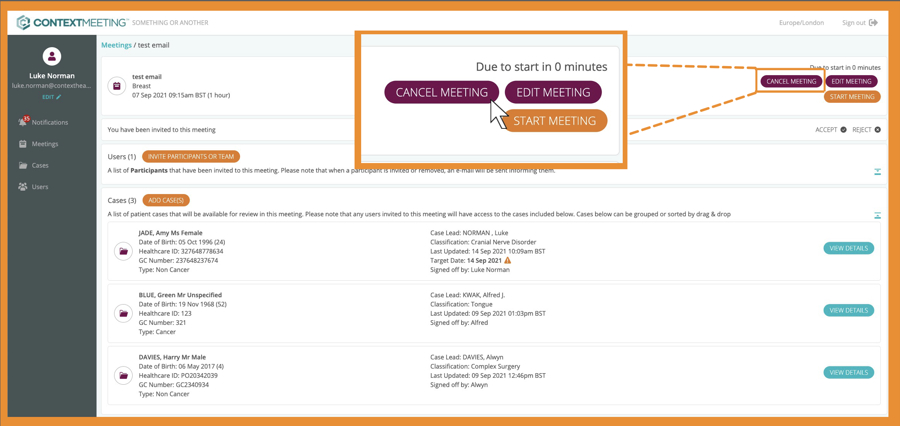
Cancel a meeting
Meeting review
The Meeting interface allows you to add cases you wish to present to the meeting as-well as invite further participants to the group.
- EDIT MEETING – Allows the Meeting Coordinator & Meeting admin to edit the meeting (see page …)
- START MEETING – Allows the Meeting Coordinator & Meeting admin to start the meeting (see next page).
- INVITE PARTICIPANTS OR TEAM – Allows the Meeting Coordinator & Meeting admin to add new meeting participants
- ADD CASE(S) – Allows all meeting participants to add cases to the meeting,
- VIEW DETAILS – Allows all meeting participants to view the case(s) in further detail

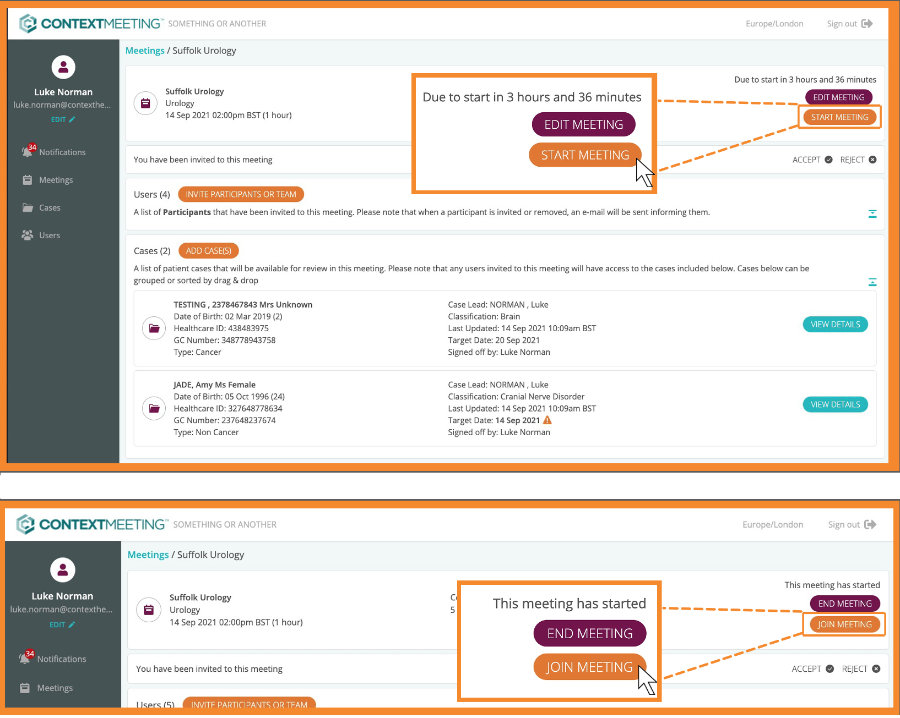
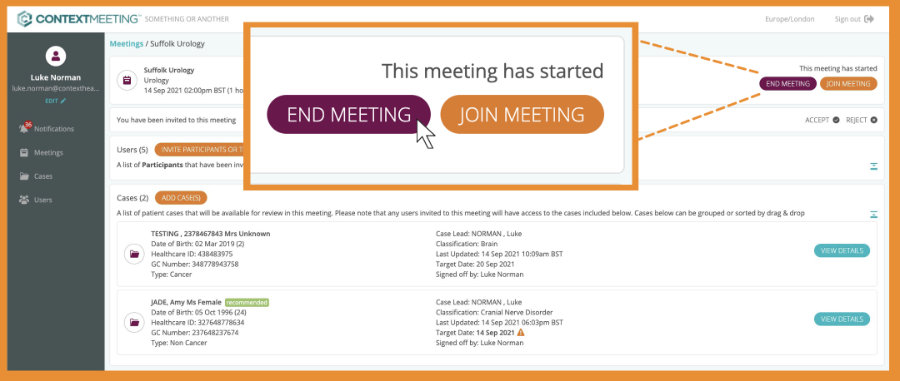
Starting a meeting
The coordinator and meeting administrators can start the meeting at the time scheduled. This allows the meeting participants to discuss cases in a live manner allows for more detailed and complex collaboration.
To start the meeting, click the start meeting button. Once the meeting has started, the meeting participants can click the join meeting button to join the meeting. (This button will only be visible when the meeting has started).
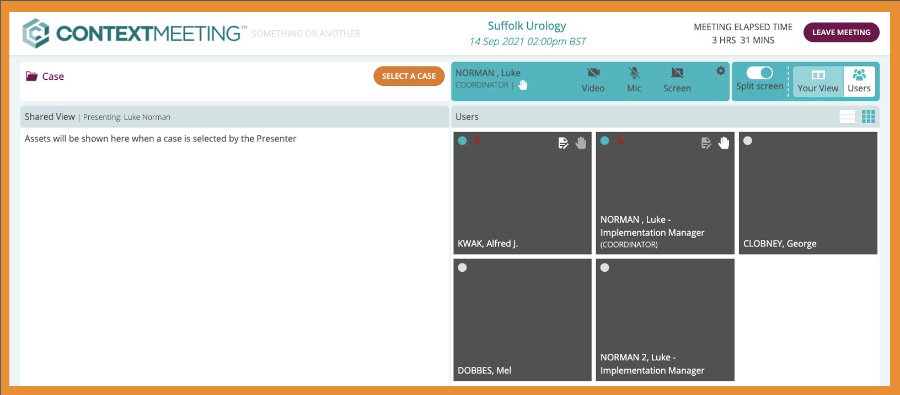
Live Meeting - The Basic Controls
When you join the meeting for the first time, please ensure you allow the browser to access audio and video. Here is a quick breakdown of all the icons and buttons on the initial meeting screen:
- SELECT A CASE button: Allows the presenter to select a case and share its content.
- VIDEO OFF / ON button: Allows users to toggle their video on and off through the meeting.
- MIC OFF / ON button: Allows users to toggle their mic on and off through the meeting.
- SCREEN SHARE OFF / ON: Allows the presenter to share their screen with the users of the meeting.
- AUDIO & VIDEO SETTINGS (cog icon): Allows the users to switch to a different camera or microphone.
- SPLIT SCREEN ON / OFF: Allows the users to switch between split screen On and Off.
- YOUR VIEW/ USERS VIEW: Allows the users to configure the LH side of their split screen and switch between seeing the users and the
case assets. - PRESENTER ICON: With this icon presented next to your name, you are the presenter. You can select cases to share and recommend with the group.
- SCRIBE ICON: With this icon presented next to your name, you are the scribe. You can scribe the recommendation for a case in your view for presenter to recommend.
- GRID VIEW/ LIST VIEW: Users can switch between the grid view which displays the users video and the list user view which displays the list of users for the meeting.
- LEAVE MEETING button: Users can click the leave meeting button to leave the meeting once i t has been concluded. This button is available at all time.
- USER ONLINE/ OFFLINE status: This icon presents next to the user to show whether they have joined the meeting.
Presenting a case
By default, the first person to join the meeting will have presenter and scribe functionality. This can be overridden and delegated by the meeting coordinator.
The Presenter can use the SELECT A CASE button to start sharing the case information. This will take you to a list where you can select the case you wish to present within the meeting. Once the case has been selected, you will be able to see the assets in the shared view.
As the presenter you will see there is a text-box to Recommend or Defer. The presenter can click on comments, decisions and recommendation asset types to share all text based assets with the group. When images and PDF files are selected, it is only that file that is presented.

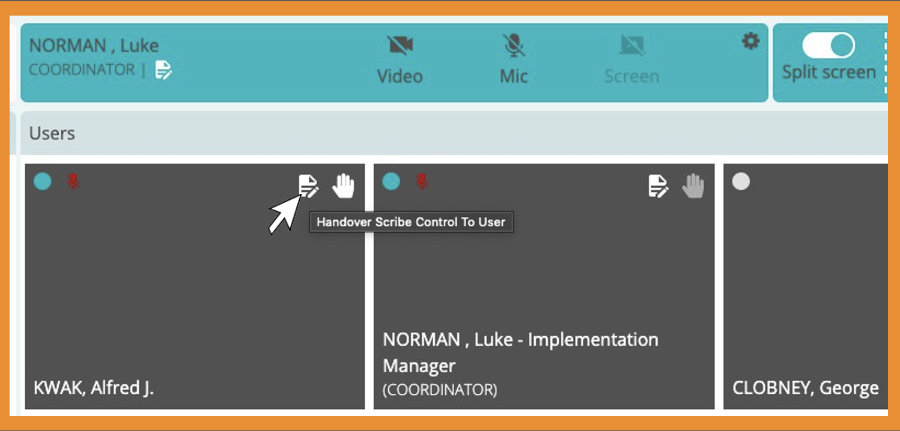
Scribing a recommendation
We have introduced the role of a scribe to the meeting to help make the collaborative process more efficient. The scribe can be allocated to a meeting participant by the coordinator. The purpose of the scribe is to take notes to formulate the basis of a recommendation which can then be checked and amended by the presenter once the case is ready to go through the approval process. Once you have taken the scribe role, the scribe icon will appear next to your name.
Please note that if you are just the scribe, you will only be able to type but not push this to the next stage of the recommendation. Other users will be able to see your scribing by clicking on your view, the presenter will be able to see the scribing by shared and your view. They will also be able to share and recommend from both views.
Meeting recommendation
The presenter can create a Meeting recommendation (or Deferral), By clicking SHARE AND RECOMMEND in the Shared view section.
Here you can make any changes to the original scribed recommendation which will be mirrored to the group via the shared view. Once you are happy with the recommendation, click REQUEST APPROVAL for the participants consent.
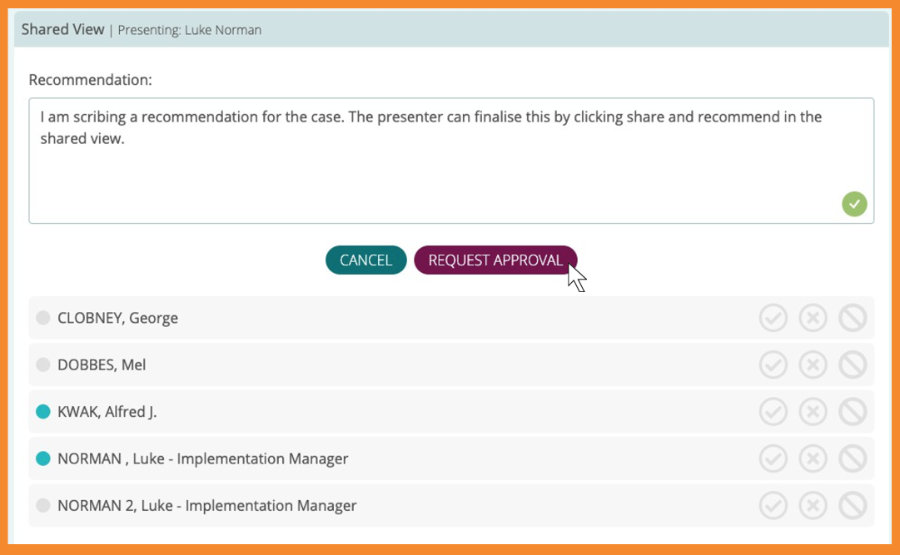
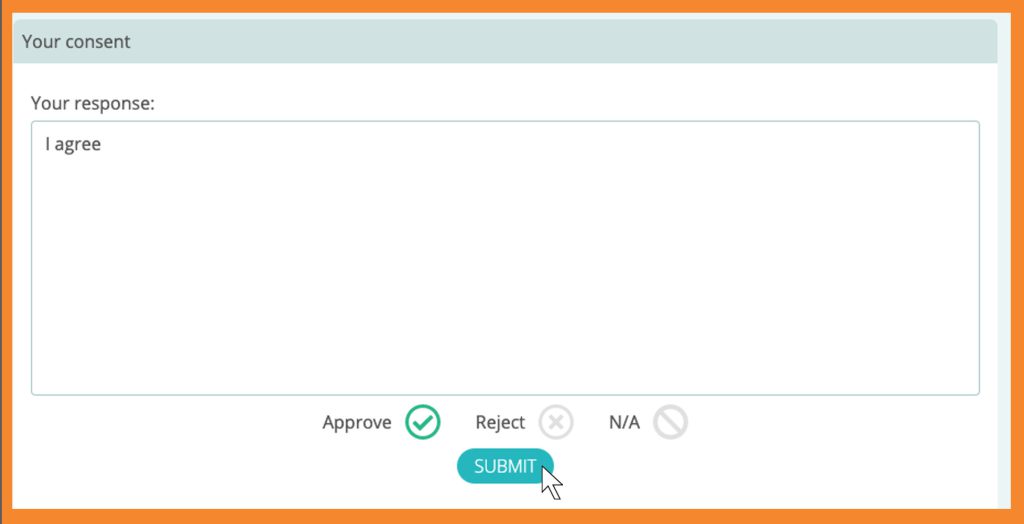
The participants will then receive a consent box in the Right hand panel of their screen to submit Approve / Reject / NA with comments. The submitted consents are reflected in the user list of the shared view. The presenter can also mark consent on behalf of other users in the list.
The presenter can now click save recommendation to post the recommendation on the case to the shared view. A report will be generated as a result of this recommendation and the case will have a status of recommended within the meeting. The recommendation is now presented in the shared view of the case with its associated report. The report can be shared and reviewed in the live meeting with the participants by simply clicking on the asset.
Ending a meeting
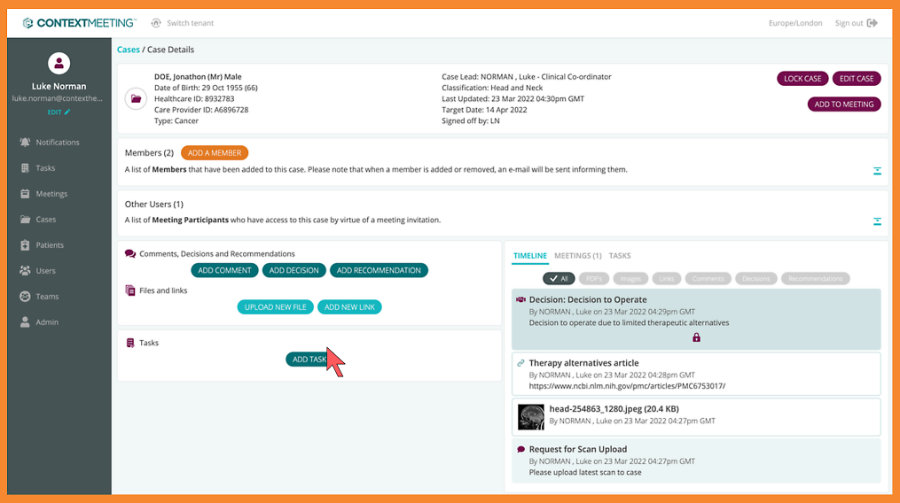
Adding tasks
Tasks can be assigned to case members using the Add Task button. The Task is a shopping list: the action is completed and there is no need to keep the Task, although you can review Tasks in isolation if needed. The Task Creator fills the form and assigns the Task.
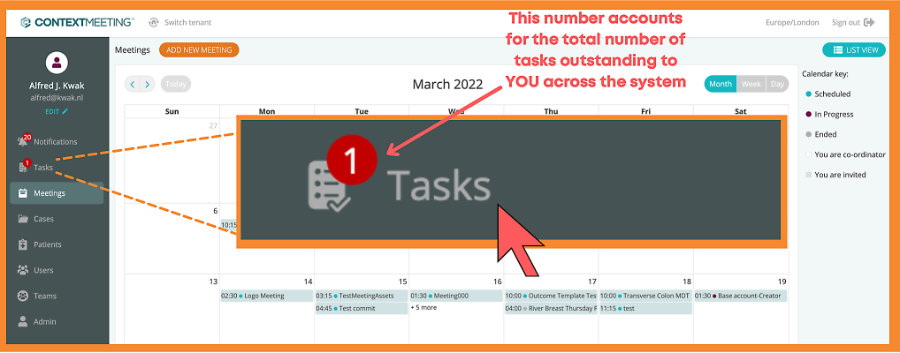
The Assignee can see an outstanding Task in the Tasks Menu section which can be selected for further detail. The Assignee can view the details of the Task and action their response from the associated case.
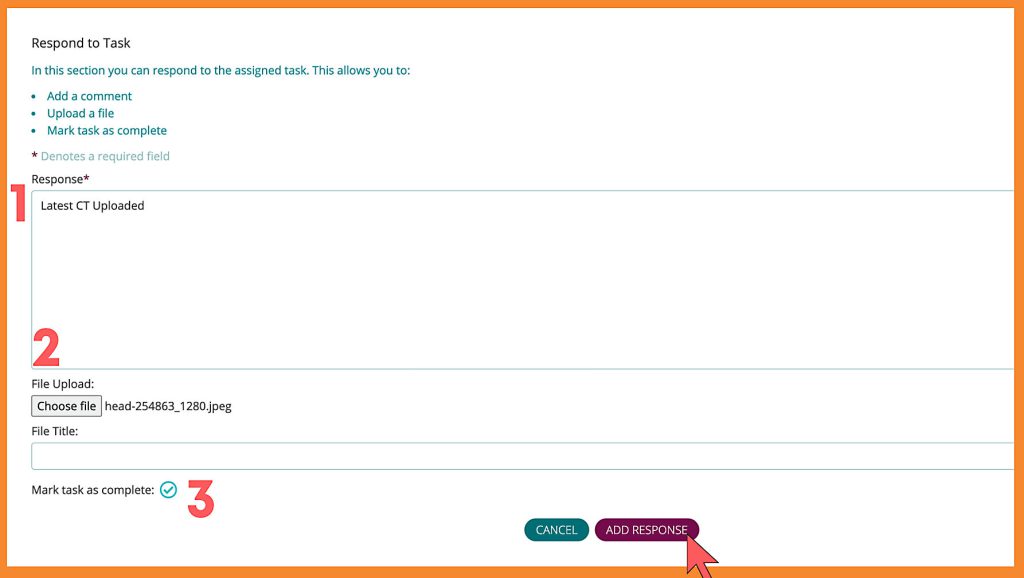
The Assignee can respond to the task with a (1) response, (2) a file upload and (3) mark the task as complete.
Please note, by marking the task as complete, you can no longer respond to the task.
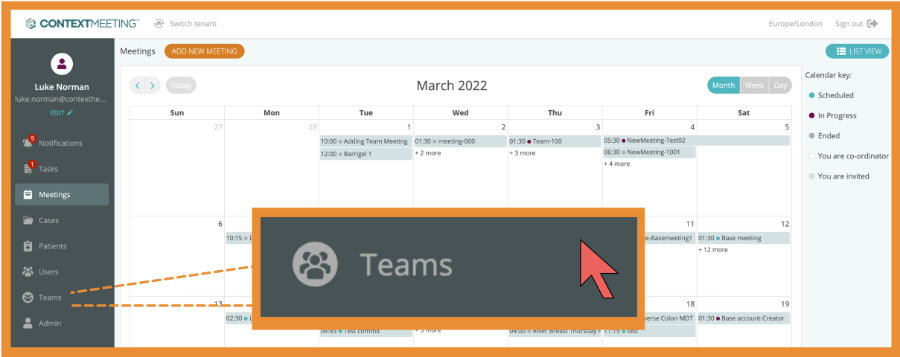
Viewing Teams
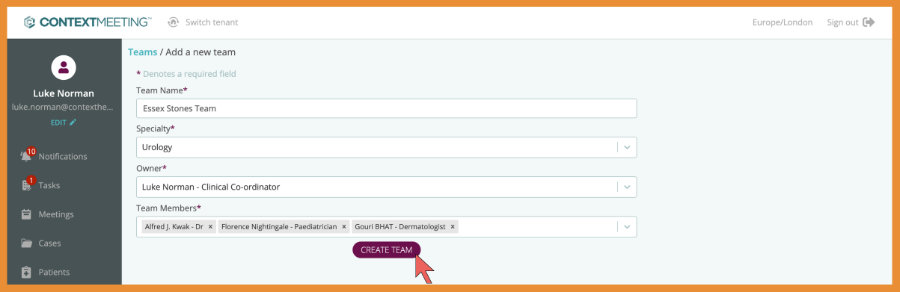
To see Teams you are associated to (either a member or owner), select the Teams section in the menu. To add a New Team, simply click the ‘Add New Team Button’. The New Team form allows you to select your team members and assign a Team Owner.
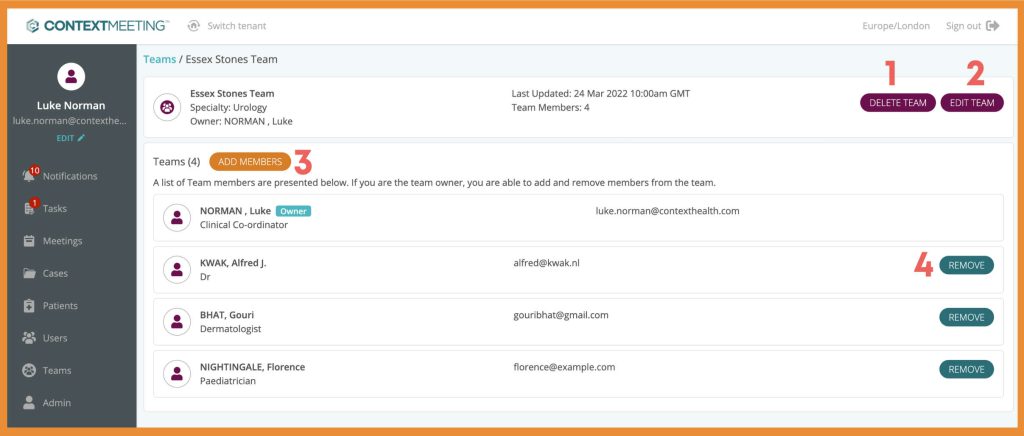
The newly created Team will present at the top of the Teams list (if you have included yourself as an owner or member). View Details to edit, add and remove members (if you are a team admin or creator). These actions apply only to the Teams function; for example, the Users are not deleted from the system if ‘Removed’.